Geotagging: Auto Mode
PhotoLinker's automatic geotagging mode is the simplest method for quickly geotagging hundreds of photos by utilizing the track log from a GPS receiver.
Loading Tracks
To use Auto Mode you can load your photos and track files by dragging them into PhotoLinker and dropping them onto the map or image browser. Tracks may need to be downloaded directly from some GPS receivers.
Using Auto Mode
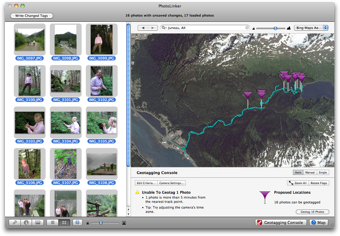
- Open the Geotagging Console and make sure that Auto is selected.

- Set the time zone and/or shift the time on your photos.
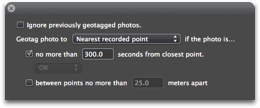
- Editing the geotagging criteria.
- When you are satisfied with the proposed locations, click the Geotag Photos button.
Time zone
Your GPS records dates and times with time zone information; your camera, however, does not. When you first open the geotagging console you are asked to enter the time zone used by your camera. If you need to shift the date and time on your photos, you can click the *Date & Time Shifter button. The proposed location flags will instantly update as you change the time zone or shift the time on the photos.
Information Bubbles

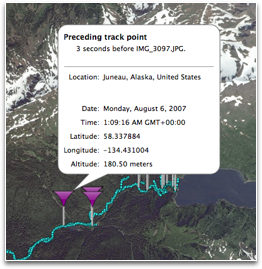
If you hover your mouse over one of the proposed locations, PhotoLinker will show an information bubble about that geotagging point.
Unable To Geotag Message
In some cases a message will be reported in the geotagging console that one or more photos cannot be geotagged. There are a number of reasons this may occur, including the photo failing the distance or time criteria. In many cases the is a result of an incorrect time zone setting.
Edit Criteria

- The first option allows you to place a restriction on the temporal distance between the nearest track point and the time the photo was taken (default: 300 seconds/5 minutes) from nearest track point).
- The second option allows you to place a restriction on the physical distance between the two track points surrounding the time the photo was taken.
- Selecting AND requires both critieria to be met before linking will occur. Selecting OR will link if one of the two criteria are met.
- If no time or distance criteria are selected, linking will occur to the nearest recorded point or time-weighted average (as selected) without restriction.
- You can choose to link the nearest recorded point in time, or the time weighted average point (if one exists, otherwise the photo will be ignored).
Additional Options
- The Zoom All will zoom the map to show all proposed locations.
- The Rotate Flags button will rotate the flags 90 degrees for cases where it may be easier to see.
How it works
Linking GPS position data to photos relies on the time stamp recorded by your camera and GPS.
A typical GPS continuously records position data (track points). Depending on the GPS settings, it may record track points every few seconds or every few minutes. Track points always contain the latitude and longitude. Often the time and altitude are recorded as well as other data.
A digital camera records the time you take a photo and saves that information to the photo. Imagine you took a photo at 9:50:20 AM. Your GPS was recording track points and recorded a track point at 9:50:01 AM and another at 9:50:30 AM. PhotoLinker finds these two track points, calling the first track point the "Preceding track point" and the second track point the "Next track point".
PhotoLinker will generate a "Time weighted average point". Using the example above, let's say you were standing at your house at 9:50:01 AM, walked for 20 seconds, took the picture, and 10 seconds later, at 9:50:30 AM you were 30 meters away. Because the photo was taken 20 seconds after you left the house, PhotoLinker calculates a point assuming you were 20 meters away from the house, called the "Time weighted average point".
Depending on your choice PhotoLinker will save the "Preceding track point", "Next track point" or the "Time weighted average point" to the photo.
Related Topics
- About geotagging
- Geotagging quick start
- Automatic geotagging mode
- Manual geotagging mode
- Single geotagging mode
- Setting the image direction and location shown
- About reverse geocoding

